Abyssal Dwarfs in KoW 4 – tier and analysis
Armour, stone, fire and slaves with an optional explosion. Since Fracture, Abyssal Dwarfs have been winning with one list – Golems that the Iron-casters deliver into combat with the Surge spell. Every unit rated – how to play it, which artefact, which spell – plus orders and advice for small, medium and big games.

Abyssal Dwarfs — B
List state: 22 September 2026, after Fracture and ahead of the announced Arrogance.
Dwarfs have always had a weakness for gold. During the God War, the Father of Lies planted a seed of greed in them, and those who gave in to him followed the riches all the way to the edge of the Abyss itself. Today their twin temple-cities, Zarak and Deiw – "power" and "pain" in the old dwarf tongue – hang above a smoking chasm, and every day thousands of slaves fall into it from their stone walkways.
Abyssal Dwarfs don't run. Abyssal Dwarfs arrive.
Slowly, in heavy armour, on Defence 5+ and 6+, with regeneration, magic that heals stone, and a column of slaves marching out in front so the enemy has somebody to hit. Behind them the obsidian Golems trundle along, overhead the Gargoyles circle, and out on the flank the Halfbreeds are whinnying – half dwarf, half beast and all trouble.
On paper, this army looks brilliant – the trouble is, paper doesn't play scenarios. After Fracture, though, it turned out that one version of it plays very well indeed.

What the results say
In the USA there are hardly any Abyssal Dwarfs. At Adepticon 2026 a single list finished 2–3, at the US Masters none made it into the round-ups of the top finishers, and in an analysis of seventeen tournaments from the first half of the year there weren't enough games to work out a separate result for them.
Britain is more interesting. Before Fracture, Abyssal Dwarfs won three twenty-player tournaments, taking the top two places at one of them. After Fracture they were second and fourth at Battle Masters (28 players) and fourth at Cogs of War (24). And then came Clash of Kings 2026: three lists won five games out of eighteen between them (5–0–13, or 27.8%) – the weakest result of any faction – and the best of them finished 58th out of 160. On top of that, their popularity is falling: Clash of Kings had eleven Abyssal Dwarfs lists in both 2024 and 2025, and in 2026 – three. In the UK season ranking they're eighth out of twenty.
The most important thing is what the good results since Fracture have in common. The three top lists – from two different players – are essentially the same list: two Regiments of Lesser Golems and a Greater Golem, Iron-casters with Surge, Angkors, Decimators and Blacksouls in the middle, plus cheap Orcs and Gore Riders for the scenario (one of the players also had two Troops of Gargoyles). Everything else – the slave list with Golekh, Ironborn with Immortal Guard, Halfbreeds as the main plan – did poorly after Fracture or never made it onto the table at all.
In Data & Dice's post-Fracture efficiency model, Abyssal Dwarfs are fifth out of twenty factions for their best profiles and eighth for their average one. The Hellfane gained 58 Elo points in that model and was one of the biggest winners of the update – except that not a single player has fielded it since Fracture. The players know better.
Hence the B. There's one proven idea for this army, and a pretty good one at that – three top-five finishes since Fracture. Everything else is, for now, a collection of pretty profiles, and Clash of Kings is a reminder that an army with fourteen units has very little room for error.
A few rules to start with
-
Four groups. The army splits into four traits:
- Ironborn – Blacksouls, Decimators, Immortal Guard;
- Slave – Ratkin, Orcs, Orc Gore Riders, Tunnel Runners, Death Engine;
- Mutant – Gargoyles, Halfbreeds, Grotesques;
- Elemental – Golems, Hellfane, Hex Caster.
A hero's Rallying is always tied to a single group, so a Mutant hero won't help the Ironborn, and vice versa. The orders depend on the trait too.
-
Orders. The lowest-ranking slave drivers aren't trusted with orcs yet – they learn the trade on the Iron-casters' mutated dogs. Some of them even survive it. Hence the first of the army's two orders:
- Mutated Throwing Mastiff (4+) – Ironborn and Slave only. The unit hurls mutated dogs: 15", eight attacks that hit on 4+ regardless of modifiers. Against Defence 4+ that's two damage – enough to clear chaff in front of the Golems or finish off a unit that's already wobbling. A Warlord gets it off 88% of the time, a Champion 75%.
- Last Breath (4+) – Slave and Mutant only. If the unit breaks by the end of the opponent's next turn, everyone who was fighting it takes 2D3 hits with CS (2), or 4D3 from a Horde. It can also be blown up straight away. An Orc Horde tied up with an enemy hammer does almost seven damage to it this way against Defence 4+. Warlord 88%, Champion 75%.
-
Unlocks.
- The Halfbreed Lord and Brakki Barka make Halfbreed Regiments Core.
- Ba'su'su makes one Troop of Gargoyles full Core.
- The Grotesque Champion moves one Regiment of Grotesques to Specialist.
- Golekh Skinflayer opens up access to Ratkin, Tunnel Runners and the Death Engine – without him, their limit is zero.
- The Overmaster allows two units of Immortal Guard to be turned into Berserkers.
Warlords
Model photos: © Mantic Entertainment Ltd. Images used with permission.
Overmaster — B-

140 points for Defence 6+, five attacks with Crushing Strength (1) and Vicious, Inspiring and Nerve 15+. A dwarf officer in full plate, and there isn't an arrow out there that frightens him.
How to play him: he stands behind the Blacksouls Horde and keeps it covered by his Inspiring. He's better kept out of combat – two and a half damage against Defence 4+ is too little to change anything. His only genuinely good argument is the Berserkers, meaning two units of Immortal Guard with Rampage (5) and Wild Charge (D3+2). If they're not part of the plan, a 90-point Iron-caster provides the same Inspiring and casts a spell on top.
Two of the three top lists after Fracture had no Warlord at all – just Iron-casters and Slave Drivers. Artefact: if any, the Torc of Command (15), for issuing orders from 18 inches away, from behind the Horde.
Ba'su'su the Vile — C+
Halfbreeds usually live short, pain-filled lives. Ba'su'su has lasted whole decades – a hybrid of many creatures, with the head of a hairless dog and two pairs of black wings – and as the Lord of Gargoyles he circles above the Abyss in a swarm of gargoyles that can blot out the sun.
230 points: Speed 10, Fly, seven attacks on 3+ with Crushing Strength (2), Regeneration (5+) and Inspiring. On top of that, one Troop of Gargoyles in his battalion becomes full Core.
How to play him: as a flying hunter of war machines and wizards. Without Vicious or Thunderous Charge he does about four damage against Defence 4+, so he's no hammer. He's best off flying out to a wing together with the Gargoyles and finishing off whatever they've tied up.
The comparison that finishes him off: the Overmaster on Ancient Winged Halfbreed costs 60 points more, hits half as hard again and has Nerve 19+ instead of 16+. And unlocking Gargoyles is a nice little extra, but no reason to pay 230 points.
Halfbreed Lord — B-
200 points, Speed 8, six attacks on 3+ with Crushing Strength (2) and Vicious, Regeneration (5+), Inspiring and Rallying for Mutants. And, above all: Halfbreed Regiments in his battalion become Core.
How to play him: his value is the unlock. Two Halfbreed Regiments as Core make a battalion whose core isn't plodding along at Speed 4. He'll chip in on a flank charge himself for about four damage, but he won't break anything. The downside: Nerve 14+ at 200 points – one decent volley and he's gone, taking the Inspiring for the whole wing with him.
Why B-? After Fracture, Halfbreeds stopped being the plan for this army, and the only list with a Lord finished Cogs of War 22nd out of 24. Artefacts: the Mead of Madness (15) for a charge an inch longer, or the Darklord's Onyx Ring (5) on the cheap.
Brakki Barka — B
Halfbreeds are usually too unpredictable to command anyone. Brakki Barka is the exception: he leads the legion of the entire temple-bastion of Bhardoom, and keeps order in his own way – a warrior who hesitates at one of his orders ends up under the hooves.
245 points: Nerve 16+, Crushing Strength (3), Dread, Retaliate!, Regeneration (5+), Vicious, Rallying for Mutants and Very Inspiring. He also makes Halfbreed Regiments Core.
How to play him: he's the only fast Very Inspiring in the army – the Slave Driver has it too, but at Speed 4 he'll never keep up with the cavalry. A wing of Brakki and two Halfbreed Regiments means more than twenty damage on the charge and morale that isn't easily broken. On his own he does about four damage against Defence 5+.
Why only B? Because since Fracture not a single player has fielded him – the Halfbreed wing lost out to the Golems.
Golekh Skinflayer — C+
The Ratkin call him Aka-Strach-Ya, which means roughly "the burning lash", and fear him more than their own god.
170 points, on a chariot: Speed 8, five attacks with Crushing Strength (1), Thunderous Charge (1) and Vicious, plus Inspiring and Rallying for Slave. Above all, though, he opens up access to Ratkin, Tunnel Runners and the Death Engine – two units of each type per battalion.
How to play him: as the key to the door, not the battering ram – on the charge he does about three damage. He rides behind the Ratkin and the Tunnel Runners, keeping them covered by his Inspiring and Rallying. The chariot is Height 4, so it can be seen over the top of all the infantry.
Why C+? The slave list has masses of bodies and plenty of Unit Strength, but the only one that played after Fracture finished Clash of Kings 152nd out of 160. Golekh only makes sense when at least two of the units he unlocks really are being taken.
Supreme Iron-caster on Great Winged Halfbreed — A-

250 points, Titan: Speed 10, Fly, Inspiring and Fireball (6) included, and for extra points Heal (4), Lightning Bolt (5) and Surge (8), plus the whole Arcane Library. And above all, Arcane Rage: every turn he casts two different spells.
How to play him: as a flying spell platform. Every turn he can cast Surge (8) and Heal (4) on the Golems – the latter takes more than two damage off a Golem on average – or work on the opponent with Blizzard and Scorched Earth, like the Warlord of the list that came second at Battle Masters. The included Fireball (6) is about three damage against Defence 4+, plus a little extra on the Nerve test. He stays out of combat – five attacks on 4+ are too few to be worth the risk – and Height 5 and Defence 5+ mean the opponent's shooters know his home address. He's best kept behind terrain, flying over to wherever he happens to be needed.
Artefacts: the Crown of the Wizard King (15) – Surge and Heal from 18 inches instead of 12; the Diadem of Dragonkind (30) – Fireball (8), which means about four damage; or the cheap Healing Brew (5).
Overmaster on Ancient Winged Halfbreed — B
290 points, Titan: Speed 10, Fly, nine attacks on 3+ with Crushing Strength (3) and Vicious, Regeneration (5+), Inspiring and Nerve 19+. This isn't an officer any more – it's a flying hammer.
How to play him: he does about six damage against Defence 4+ and 5+ – every turn, no charge required. Fly lets him pick his fights: flanks, war machines, wizards, finishing off anything that's already wobbling. And while he's at it, his Inspiring keeps up with the Halfbreeds.
The trouble is, all of that costs 290 points. Nerve 19+ on Defence 5+ comes down to two Lightning Bolts and one decent volley, and Height 5 means he can be seen from anywhere on the table. After Fracture one list played him – 22nd out of 24. For that money there's a Greater Golem with 80 points to spare. Artefact: the Blessing of the Gods (25) – almost one extra damage a turn.
Champions
Iron-caster — S
Iron-casters rarely rule openly, but they're the ones standing behind many an Overmaster – and they're the ones who create the Golems, the Halfbreeds and every machine in this army.
90 points for Inspiring and access to a superb spell list, the most important of which is Surge (8). Every one of the top lists after Fracture had at least one Iron-caster with Surge, and two of them had two.
How to play him: he stands right behind the Golems and casts Surge on them every turn. That's four inches of movement in the shooting phase on average, and if a Golem reaches the enemy that way, it's a charge – often from a spot nobody expected it from. Two Iron-casters mean Golems that can cover an extra eight inches in a turn.
Spells:
- Surge (8) for 30 – compulsory, on every one of them;
- Heal (3) for 15 – on Golems it takes off almost two damage on average, because on them the Iron-caster's Heal has Elite;
- Bane Chant (3) for 30 – a Blacksouls Horde with shields jumps from about seven to nearly ten damage against Defence 4+;
- Blizzard (4) from the Arcane Library for 40 – for the turn when the Golems don't need any help;
- Mind Fog (2) for 15 – on a unit the Decimators have just shot up.
Two specialised Iron-casters – one with Surge and Heal, the other with Surge and Blizzard or Bane Chant – are better than one who knows all the answers but can only give one per turn.
Artefacts:
- Crown of the Wizard King (15) – Surge, Heal and Bane Chant from 18 inches instead of 12. At Speed 4, that's the difference between "made it" and "watched from afar";
- Tome of Darkness (20) – Surge (11), which means five and a half inches on average instead of four;
- Amulet of the Fireheart (15) – for the turn when a Golem needs both Surge and Heal;
- Shroud of the Saint (25) – Heal (5), for fans of the grind.
The downside: Speed 4, Nerve 13+ and US 1. He stays behind the line and doesn't poke his nose out – without him, the Golems are just very hard, very slow rocks.
Slave Driver — B+

95 points for Very Inspiring and Rallying for Slave. Five points more than an Iron-caster, minus the spell – but plus a whip.
How to play him: he stands behind the Orcs and Gore Riders, and his Very Inspiring reaches the Golems while he's at it. The best trick the top lists pulled after Fracture is the Tome of Darkness (20): the Slave Driver gets Surge (5), which makes a third Surge in the army – two and a half inches more for a Golem on average. A 115-point Slave Driver is Very Inspiring and extra Golem movement rolled into one. That's how both fourth-place lists played him.
He doesn't fight himself, and that's how it should stay – his single attack on 4+ is more a gesture of disapproval than a threat.
Soulless — C
150 points, Melee 3+, four attacks with Crushing Strength (1) and Vicious, Fearless, Regeneration (5+), Inspiring and Rallying for Ironborn. The name says it all – no soul, and not much point either.
How to play him: he stands between the Blacksouls and the Immortal Guard, and in combat he'll do about two damage. His only argument is Rallying for Ironborn, and 150 points is steep for that when an Iron-caster with Heal costs 105 and does more, and Bastion from the Arcane Library gives a similar effect for a fraction of the price. After Fracture two lists played him, both from the bottom of the table.
Infernox — B-

175 points, Large Infantry: Defence 6+, six attacks on 3+ with Crushing Strength (2), Thunderous Charge (1), Brutal (1) and Vicious, Fearless, Wild Charge (D3) and a Molten Boulder at 12". An armoured beast with a fondness for throwing rocks.
How to play him: on the charge he does about four damage against Defence 4+ and 5+, plus Brutal. He holds a flank, clears chaff and chips in on a shared fight, and with Wild Charge he charges 11–13 inches. The downside: Nerve 13+, US 1 and no Inspiring. Defence 6+ gives a false sense of security – an opponent with Crushing Strength or Piercing will take him off the table faster than it looks.
A neat trick: the Inspiring Talisman (30). For 205 points, that's Inspiring on a Defence 6+, Fearless body that also happens to fight.
Grotesque Champion — B

225 points, Large Cavalry: seven attacks on 3+ with Crushing Strength (2), Brutal (1) and Vicious, Regeneration (5+), Retaliate!, Strider, Inspiring and Rallying for Mutants. On top of that, one Regiment of Grotesques in his battalion becomes Specialist.
How to play him: he fights decently – about four and a half damage against Defence 4+ every turn, plus Brutal. His second job is logistics: he moves the Grotesques to Specialist, which frees up room in Support for the Greater Golem and the Angkors. The list that came second at Battle Masters took him without Grotesques, though – as a hard-hitting hero with Inspiring on the wing. The downside: 225 points for US 1 and Height 4. A cheap artefact: the Blade of Slashing (5).
Core
Ratkin — C+

A Regiment for 75 points (US 2, Nerve 14+), a Horde for 120 (25 attacks, US 4, Nerve 21+). Melee 5+ and Defence 3+ make it perfectly clear what wasn't paid for. They're only available with Golekh.
How to play them: not for fighting. Even so, the 120-point Horde is the cheapest scoring in the army, a screen in front of the Blacksouls or the Golems, and something for the opponent to waste shooting on. They're Speed 6, which makes them faster than the rest of the infantry – it's better they don't go running off ahead of the line on their own. For an explosive farewell, Last Breath does the job for free – no need for the 35-point Crystal Pendant of Retribution.
C+, because all their value hinges on Golekh.
Blacksouls — A

Abyssal Dwarfs squabble among themselves non-stop, but in the ranks of the Blacksouls they work together – because that's the most effective way to cause the enemy pain. The knives in the back only come out after the battle.
Troop for 85 points, Regiment for 115, Horde for 185. Speed 4, Melee 4+, Defence 5+ and Vicious. Shields can be swapped for two-handed weapons for free: Defence 4+ and Crushing Strength (1).
How to play them: the Horde is the anvil in the middle. 185 points for Nerve 24+, Defence 5+ and US 4 is a wall the opponent spends half the game bruising their hammers on, and with shields it still does about seven damage against Defence 4+. Shields or two-handers? Shields by default – an anvil is supposed to stand for three turns, not die in a blaze of glory in the second. With Bane Chant, the Horde with shields hits just as hard as the two-handed one and still has Defence 5+. Before the fighting starts, the Mutated Throwing Mastiff adds its two damage from 15 inches.
The 115-point Regiment is a second Core unit and someone to hold a flank. The Troop – not worth the points.
For the Horde:
- Staying Stone (15) – Nerve 25+;
- Orb of Towering Presence (15) – US 5, which means scoring in an army that's short of bodies;
- Fire-Oil (5) – against opponents with regeneration, as in the list that came fourth at Cogs of War.
Why not S? Because Speed 4 means it's the opponent who decides whether to fight them at all. And 25 attacks on 4+ without Crushing Strength won't crack a well-armoured target.
Decimators — A

Decimators fire short blunderbusses meant not so much to kill as to maim – so that the victim can be dragged off to the slave mines afterwards.
Troop for 110 points, Regiment for 140, Horde for 240. Shooting 4+, Defence 4+ and a Blunderbuss at 14" with Piercing (1) and Vicious.
How to play them: this is the only shooting in the army that actually works, and after Fracture it was in every one of the seven lists. After a Halt!, a Regiment does about five damage against Defence 4+, and a Horde more than ten. A 14" range plus Speed 4 makes an 18-inch threat zone – a Horde after a Halt! can take out a cavalry regiment in a single turn. The Horde stands in the middle as a second wall, one that shoots; two Regiments do a better job of guarding the flanks.
Artefact: the Blessing of the Gods (25) on the Horde – almost two extra damage per volley. After the volley, Mind Fog from an Iron-caster goes on whatever just got hit.
Downsides: Defence 4+, the only one of its kind among the Ironborn. An opponent with Speed 7+ can charge them from the same distance they shoot from, and Halt! takes planning two turns ahead.
Immortal Guard — B-

The Immortal Guard pledge themselves body and soul not to a person, but to a title. When its holder dies, they guard the successor – and so on for all eternity, until nothing is left of the dwarf but armour and obedience.
Troop for 150 points, Regiment for 195. Melee 3+, Defence 5+, Crushing Strength (1), Fearless, Regeneration (5+) and Vicious. The Regiment has 15 attacks and Nerve 17+.
How to play them: the Regiment does about eight damage against Defence 4+, and close to ten with Bane Chant. Best used as a second wave behind the Blacksouls, or as a block that can't be scared off an objective. The Berserker option (needs an Overmaster): Defence 4+, but Rampage (5) and an 11–13 inch charge – the only way Ironborn infantry are ever going to catch anyone.
Why B-? Because it lives next door to the Blacksouls Horde. For 195 points it hits a bit harder, but it has half the Unit Strength and Nerve 17+ instead of 24+. After Fracture three lists played them, all from the bottom of the tables. The Troop – not worth the points. Artefact: the Blade of Slashing (5).
Orcs — B+

To the Abyssal Dwarfs, orcs are the ideal slave-soldiers: a living shield and a battering ram in one. How many of them die doesn't matter – there are always more.
Regiment for 90 points, Horde for 140. Melee 5+, Defence 4+, Crushing Strength (1), Speed 5 and the Slave trait. A maximum of two units per battalion.
How to play them: the 140-point Horde is the cheapest scoring in the army that doesn't need Golekh – US 4, Nerve 21+ and 25 attacks that aren't entirely harmless. The 90-point Regiment is cheap Core. The top lists took either a Horde or two Regiments and stood them in front of the Golems as a screen. If the screen is going to fall anyway, Last Breath turns it into a trap for whoever is pounding on it. Artefacts would be wasted on them – they're still slaves, and the budget should remember that too.
Gargoyles — B
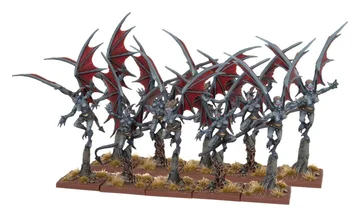
Troop for 105 points: Speed 10, Fly, ten attacks on 4+ and Regeneration (4+). But Nerve 10+ and Defence 3+. Dwarf pigeons – they fly about, make a mess and drop dead at the slightest thing.
How to play them: they're fast chaff and scoring in an army where almost everything moves at Speed 4–6. They block charges, screen the Golems, hunt war machines with Shooting 6+, and in the last turn they fly over to an empty objective. In combat they'll do about two and a half damage – and that's enough. Both fourth-place lists after Fracture had two Troops each.
Trouble is, 105 points for chaff with Nerve 10+ is pricey – Goblins get a Rabble Regiment for 80 with US 2. Artefacts would be wasted on them: 105-point chaff is fine; 140-point chaff starts raising questions for the accountant.
Specialists
Lesser Obsidian Golems — S

Fighting a Golem is like fighting an avalanche. Golems are slow and dim-witted, though – once they've finished pounding away, they stand there and wait for new orders. That's what Iron-casters are for.
Troop for 130 points, Regiment for 185. Defence 6+, Crushing Strength (2), Fearless, Vicious and Shambling. The Regiment has sixteen attacks and Nerve 17+.
How to play them: the Regiment does about eight damage against Defence 4+, six against 5+ and almost five against 6+, and the opponent needs Crushing Strength or Piercing just to make a dent in it. Everything starts with Surge, though: slow Golems suddenly charge in the shooting phase, and from a spot nobody expected them from – ideally into a flank nobody was watching. Two Regiments side by side, with Iron-casters with Surge and Heal behind them – that's how all three top lists after Fracture played them.
The Regiment is the one to take; the Troop only as an anchor in small games. Artefact: the Mace of Crushing (5) on the cheap, or the Brew of Sharpness (45) – two extra damage against Defence 5+. Brew of Strength isn't needed, because CS (2) is enough for most targets.
Downsides: Speed 5, Melee 4+ and Height 3, so they won't hide behind the Blacksouls. Without a wizard they're just very hard, very slow rocks.
Orc Gore Riders — B+

Troop for 90 points, Regiment for 135. Speed 8, Melee 4+, Defence 4+ and Thunderous Charge (2). A maximum of two units per battalion.
How to play them: they're the cheapest hammer in the army and the only fast hammer in the Golem list – after Fracture, Gore Riders were in every top list. On the charge the Regiment does about seven and a half damage against Defence 4+, and from a 16-inch range at that. Perfect for slamming into the flank of a unit the Blacksouls or the Golems have just stopped in its tracks, and in the endgame – for grabbing a distant objective. It's a single-use hammer, though: after the charge what's left is eighteen attacks without Thunderous Charge, and Nerve 14+ and Defence 4+ won't survive the counter-attack.
Artefacts: Sir Jesse's Boots of Striding (15) for that one charge through a wood or over a fence, or the Brew of Haste (20) – Speed 9 and an 18-inch charge. The 90-point Troop with Nerve 11+ – only for war machines and chaff.
Abyssal Halfbreeds — A-

Halfbreeds are the Iron-casters' most famous experiment: a dwarf's torso fused to the body of an abyssal beast. Constant pain drives them into a fury – most of them charge the enemy the moment they see it.
Troop for 145 points, Regiment for 220. Speed 8, Melee 3+, Defence 4+, Crushing Strength (1), Thunderous Charge (1), Regeneration (5+) and Vicious.
How to play them: on the charge the Regiment does about twelve damage against Defence 4+, nine against 5+ and seven against 6+, and after the charge it still hits for nine. On top of that it regenerates, has Nerve 17+ and a 16-inch charge range. Patience matters most: the mere threat of a 16-inch charge forces the opponent to keep an eye on that wing, and the Halfbreeds go into the flank of a unit that's already stuck on the Blacksouls or the Golems – never into the front of heavy infantry with Crushing Strength.
Why A- and not S? The profile is still one of the best in the army, but after Fracture Halfbreeds were in only one of the three top lists. Golems with Surge do a similar job and are harder to kill.
Artefacts and spells: Sir Jesse's Boots of Striding (15) – that's how three lists ran them after Fracture; Brew of Strength (40) – on the charge it damages on 2+ against anything up to and including Defence 5+. Bane Chant after the charge restores their Crushing Strength (2).
Ratkin Slave Tunnel Runners — B

210 points for a chariot with Speed 8, Defence 5+, 24 attacks on 4+, Brutal (1), Crushing Strength (1) and Thunderous Charge (1). Nerve 16+. Only available with Golekh.
How to play them: twenty-four attacks is an awful lot – about ten damage on the charge against Defence 4+, plus Brutal. They work best behind a cheaper screen: the Ratkin take the first fight, and the Tunnel Runners drive into the gap that opens up. Downsides: Nerve 16+, Height 4 and Melee 4+ – a 210-point unit doesn't want to be left, after its charge, somewhere the opponent can answer with two regiments.
Artefact: the Brew of Sharpness (45) – more than three extra damage on the charge; that's how the slave list at Clash of Kings ran them. The profile on its own is worth a B+, but it needs a 170-point Golekh.
Dragon Fire Team — C

105 points for twelve shots from a Blackfire-gun at 14" with Shattering (1) and Vicious. Shooting 4+ and Defence 5+ – pretty respectable for a war machine.
How to play it: after a Halt! it does about four and a half damage against Defence 4+, but with no Piercing it's down to three or less against heavier targets. The 14" range means it stands where the Decimators stand – in other words, right where the opponent is going to turn up in a hurry. In the Specialist section it competes with the Golems and the Gore Riders, and a Regiment of Decimators for 35 points more deals more damage, has US 2 and Nerve 16+. The only list with two Dragon Fire Teams after Fracture finished its tournament 22nd out of 24.
Support
Grotesques — B

Grotesques are so dangerous that they usually have to be destroyed after every battle – otherwise they'd kill their own masters.
Troop for 185 points, Regiment for 270. Speed 7, Defence 5+, Crushing Strength (2), Brutal (1), Regeneration (5+), Retaliate!, Strider and Vicious. The Regiment has twenty attacks and Nerve 18+.
How to play them: the Regiment does about ten damage against Defence 4+ plus Brutal – every turn, no charge needed. Regeneration, Retaliate! and Nerve 18+ mean it isn't afraid of the counter-attack: it wades into the middle of the fight and stays there, and with Strider it'll also go into terrain the Halfbreeds don't like. Compared with the Halfbreeds, they hit softer on the charge and cost more, but they're tougher.
Why B? Because 270 points is a lot, and the Greater Golem and the Angkors are waiting in Support. The Grotesque Champion solves that problem by moving them to Specialist. The 185-point Troop with US 1 – not worth the points. Artefact: the Brew of Strength (40) – almost ten damage against Defence 5+ instead of eight.
Hex Caster — C+

Hex Casters are small, insect-like constructs that bring bad luck down on the enemy. They're so subtle they can even be set on an ally – many an Overmaster only realised when it was too late.
130 points, Hex (3) included, Weakness (3) for 20, the Arcane Library, plus Fearless, Spellward, Cloak of Death and Feedback.
How to play it: Hex goes on an enemy spellcaster, and Weakness (3) on the enemy hammer just before it smashes into the Blacksouls Horde. A Horde with 25 attacks on 3+ and CS (1) that would do eight damage to Blacksouls with shields will do just under six – and the anvil stands for one more turn. Except the Hex Caster sits in Support, where it competes with the Golem and the Angkors, gives no Inspiring and has Nerve 11+. It's worth taking to a tournament where a lot of magic-heavy armies are expected.
Ratkin Slave Death Engine — B-

165 points, Monster (Chariot): Speed 8, D6+7 attacks on 4+, Crushing Strength (2), Fearless, Rampage (D6) and Vicious. Nerve 16+. Only available with Golekh.
How to play it: an average of ten and a half attacks, which is about five damage against Defence 4+, and more with Rampage into infantry, cavalry or war machines. Anywhere from 8 to 13 attacks – the Death Engine likes to surprise people, in both directions. Cheap, Fearless, with US 2 and Speed 8: it goes into flanks, clears chaff and doesn't run away. Downsides: Defence 4+ at 165 points, Height 5 (visible from space) and the competition in Support.
Greater Obsidian Golem — A

210 points, Titan: Speed 6, twelve attacks on 4+ with Crushing Strength (3) and Vicious, Defence 6+, Fearless, Shambling, Strider and Nerve 18+.
How to play it: it's a Titan that's almost impossible to shift. Defence 6+, Fearless, Nerve 18+ and US 2 for 210 points – it plants itself on an objective and doesn't leave, and it strolls through terrain as if it were a dance floor. It does about six damage against Defence 4+ and 5+, and almost five against 6+. On its own it's predictable, but with Surge and Heal from an Iron-caster it becomes a problem the opponent won't solve in a single turn. After Fracture it was in six of the seven lists, including all of the top ones.
Artefact: the Brew of Sharpness (45) – almost two extra damage a turn – or the cheaper Blessing of the Gods (25) for one.
Hellfane — B

Hellfanes are brass shrines that channel the power of the Abyss into the dwarfs standing next to them. They were devised by Dravek Dalken, a pupil of Arhak Soulbinder, and since they only work up close, in battle they're carried by obsidian beasts.
260 points, Titan: Speed 6, nine attacks on 3+ with Crushing Strength (2), Thunderous Charge (2), Rampage (6) and Vicious, Defence 6+, Fearless, Strider and Nerve 18+. Plus Masterwork Pistols at 18" with five shots and Piercing (1).
How to play it: on the charge it does about six damage whatever the armour, and with Rampage into infantry, cavalry or war machines it has fifteen attacks and nearly ten damage. Its job is to wade into the middle of the battle and create a problem there that the opponent has nothing to solve with. The pistols are a nice extra in a turn without combat.
Why B and not A? On paper it's the army's best Titan, but after Fracture nobody fielded it. The top lists give the Titan's place to the Greater Golem: it's 50 points cheaper, and Surge delivers it into combat – the Hellfane isn't Shambling, so Surge won't speed it up. Artefact, if any: the Brew of Sharpness (45) – about twelve damage with Rampage. Downsides: Speed 6, meaning a 12-inch charge, 260 points riding on Nerve 18+, and Height 5 – everybody knows where it is.
G'rog Mortar — D
95 points, two shots at 48", Blast (D3+1), Indirect, Piercing (2), Reload and Vicious. Shooting 6+.
Sounds scary, right up until the Shooting stat. After a Halt! it averages less than one hit a turn and just under two damage. It can go three turns without hitting a thing, thoroughly earning its reputation as the most expensive noise generator in the army.
On top of that it sits in Support, where the Greater Golem and the Angkors are waiting, and the Angkor does the same job twice as well for 45 points more. It's best left out. The only exception is really small games, where nothing else shoots 48 inches.
Katsuchan Rocket Launcher — C-
100 points, four rockets at 48", Blast (D3), Indirect, Piercing (1), Reload and Vicious. Shooting 6+.
Twice as many attempts to hit as the G'rog, so a bit more predictable. Except "a bit more" means about two damage a turn against Defence 4+ – the goblin Sharpstick Thrower does almost as much for 65 points. The rockets do fine against soft targets with Defence 3+ and 4+, and for finishing off morale after a Decimators volley. If at all, then as a second long-range gun when the points won't stretch to a second Angkor – that's how the list that came second at Battle Masters played it.
Angkor Heavy Mortar — A-
Abyssal Dwarf machines have the maws of abyssals for a reason: the Iron-casters seal the essence of the children of Ariagful inside them. Every machine is alive in its own way, and rages inside its metal prison.
140 points, three shots at 48", Blast (D3+2), Indirect, Piercing (2), Reload, Shattering (D3) and Vicious. Shooting 6+.
How to play it: after a Halt! it averages one hit, which Blast turns into four with Piercing (2), plus Shattering. About four damage against Defence 4+, three against 5+ and more than two against 6+ – whether or not the target is standing behind a hill. It's the answer to heavily armoured opponents – Dwarfs, other Abyssal Dwarfs, enemy Golems – that the Decimators can't get to. They stand in the back corners and work on the same target as the Decimators.
How many? Two. With Shooting 6+, a single Angkor will hit nothing roughly one turn in three, while two stop being a lottery. Three of the four best lists after Fracture had two each.
How to play Abyssal Dwarfs
The list that works: Golems and Surge
After Fracture, this army wins when it looks roughly like this:
- at the front, two Regiments of Lesser Golems and a Greater Golem;
- right behind them, two Iron-casters with Surge (8) and Heal or Blizzard, often also a Slave Driver with the Tome of Darkness as the third Surge;
- in the middle, a Blacksouls Horde and a Decimators Horde (or two Regiments);
- at the back, two Angkors;
- for the scenario, cheap Orcs, two Troops of Gargoyles and Gore Riders.
Fifteen to seventeen units and Unit Strength 27–30. Either there's no Warlord, or the Warlord is a Supreme Iron-caster.
Game plan
- Deployment. An opponent with twenty-odd units will see almost the whole army before putting down their most important pieces – there's no cure for that. The Decimators, Blacksouls and Angkors go on the table first, the Golems and Iron-casters last, ideally opposite whatever the opponent wants to protect.
- First turns. The Angkors fire from turn one at the heaviest target. The Orcs and Gargoyles take up space and objectives, and the Mutated Throwing Mastiff clears away chaff standing in the Golems' way. The Golems advance – Surge is saved for the moment it can deliver them into combat.
- Mid-game. Surge turns a few inches into a charge: the Golems get into combat in the shooting phase, often into a flank, and from a distance the opponent didn't count on. Heal patches them up after every fight. The Decimators, after a Halt!, shoot whatever has come up into the middle, the Gore Riders go into a flank, and an Orc Horde that's been tied up can be blown up with the Last Breath order.
- Endgame. The Golems and the Greater Golem stand on objectives and can't be pushed off them, the Blacksouls Horde and the Decimators Horde have US 4 each, and the Gargoyles and Gore Riders fly and ride over to distant objectives.
Other ideas for this army
- The Mutant wing – Brakki or a Halfbreed Lord with two Halfbreed Regiments as Core. The fastest and flashiest version of the army – except nobody has won anything with it since Fracture.
- The slave list – Golekh, Ratkin Hordes, Tunnel Runners and the Death Engine. Lots of bodies and Unit Strength, but the only such list after Fracture finished Clash of Kings in the bottom ten.
- The Ironborn wall – Blacksouls, Immortal Guard, the Soulless, an Overmaster with Berserkers. Very tough and very slow; after Fracture, lists like that ended up at the bottom of the tables.
If anything, it's better to add one piece from these packages to the Golem core – Halfbreeds or a Grotesque Champion – than to build the army from scratch. One unit from each package is a recipe for heroes whose Rallying covers a single target, and synergies that have been paid for but that nobody uses.
What to be scared of
- Iron-caster hunters. Snipers, flyers and spells aimed at heroes – without the Iron-casters, the Golems are very hard, very slow rocks.
- Cheap chaff – Rabble, Ratkin – that stands in the Golems' way and blocks the Halfbreeds' charges.
- Piercing (2) and above, Crushing Strength (3) and above against the Golems.
- Blasts and Indirect fire aimed at the Decimators and their Defence 4+.
- Fast armies with twenty-odd units that have no need to come within 14 inches at all.
Small games
Up to 1000 points – Golems in miniature:
- an Iron-caster with Surge (8) and Heal (135);
- a Regiment of Blacksouls (115);
- a Regiment of Decimators (140);
- a Regiment of Orcs (90);
- a Troop of Gargoyles (105);
- a Regiment of Lesser Golems (185);
- a Troop of Orc Gore Riders (90);
- an Angkor Heavy Mortar (140).
Exactly 1000 points in total. One Golem unit, one Surge, one Angkor and three cheap units for the scenario. Titans are better left out – at this level, 210–290 points is more than a fifth of the army, and one bad fight can end the game.
Medium games
At 2000 points – the full Golem engine:
- an Iron-caster with Surge (8) and Heal (135);
- an Iron-caster with Surge (8) (120);
- a Slave Driver with the Tome of Darkness (115);
- a Blacksouls Horde (185);
- a Decimators Horde (240);
- a Troop of Gargoyles (105);
- a Regiment of Orcs (90);
- two Regiments of Lesser Golems (370);
- a Regiment of Orc Gore Riders (135);
- a Greater Obsidian Golem (210);
- two Angkor Heavy Mortars (280).
1985 points in total and thirteen units. Three Surges a turn, two anvils in the middle, two mortars at the back. What not to do: the Hellfane and the Greater Golem together below 2000 points – 470 points in two Speed 6 Titans, in an army that's short of units as it is.
Big games
At 2300 points – the list that came fourth at Cogs of War 2026:
- an Iron-caster with the Amulet of the Fireheart, Surge (8) and Blizzard (4);
- an Iron-caster with the Crown of the Wizard King, Surge (8) and Host Shadowbeast (8);
- a Slave Driver with the Tome of Darkness;
- a Blacksouls Horde with Fire-Oil;
- a Decimators Horde with the Aegis of the Elohi;
- two Troops of Gargoyles and two Regiments of Orcs;
- two Regiments of Lesser Golems;
- a Regiment of Orc Gore Riders with Sir Jesse's Boots of Striding;
- a Greater Obsidian Golem;
- two Angkor Heavy Mortars.
Fifteen units, US 27, exactly 2300 points and not a single Warlord. At Battle Masters (2500 points) the same player added a second Slave Driver and a second Regiment of Gore Riders, and finished fourth.
The version with a flying wizard is the list that came second at Battle Masters: a Supreme Iron-caster as Warlord (Blizzard and Scorched Earth every turn), one Iron-caster with Heal and Surge, a Grotesque Champion, two Regiments of Lesser Golems, a Greater Golem, two Regiments of Decimators, two units of Blacksouls, an Orc Horde, Halfbreeds with the boots, Gore Riders, an Angkor and a Katsuchan.
Pitfalls:
- All the packages at once. Golems, Halfbreeds, slaves and Ironborn in a single list make four halves of an army.
- Artefacts for everyone. The army has few units, so a 45-point artefact is a sizeable chunk of the list. The top players mostly bought trinkets for 5–20 points: the Tome of Darkness, the boots, the Crown of the Wizard King.
- Too few units. Even at 2300 points there'll be fifteen, seventeen of them. Every expensive model that takes the place of Orcs or Gargoyles costs the army a vote on the scenario.
Abyssal Dwarfs won't beat an opponent who comes for them on terms of their own choosing. Nor will they win if they let themselves get stretched across the whole table. They win when the enemy has to come to the anvil, and the Golems are suddenly standing somewhere they had no business reaching in time. And that's exactly why this is an army for the patient – because patience is the one thing the dwarfs of the Abyss have never been short of.
We write these articles in our spare time, with no ads. If this one helped you, ☕ buy us a coffee.